
How to make Master-Detail Page Navigation menu in Xamarin.Forms with Prism
Sunday, March 25, 2018
Last year I made similar blog post to this, and it was about making Master Detail menu page in Xamarin.Forms. That blog post is one of the most popular posts on my blog. At this moment I am a big fan of great Prism library and I decided to write this blog post again but this time using great framework called Prism.
For those who are not familiar with Prism I strongly recommend you to watch this great video session from Brian Lagunas, he is talking and demonstrating the best features of Prism. You can find that session HERE.... and I know I know I am mentioning word "great" to many times, but the reason is because Prism is GREAT!
Prism is a XAML Application framework and some of the key features are:
- MVVM Support
- Commanding
- Messaging
- Navigation
- Page Dialog Service
- Logging
- Dependency Injection
For this blog post this is enough about Prism, I will make separate more detailed blog post on my thoughts about it.
Also this blog post will cover the topic of making our Master-Detail Page via MVVM using Prism, so if you are not familiar with MVVM, do some research there are a lot of resources out there and I also have some tutorials about it here on my blog.
To start with this tutorial create new Xamarin.Forms App. I will use .NET Standard as a code sharing strategy.
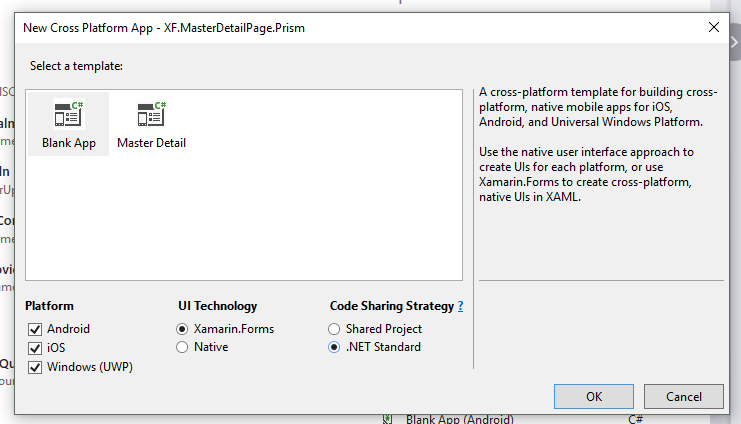
After you create new project, we need to grab some nuget packages that we need to start using Prism. Quick note is that there is Prism Templates, but in this blog post I will set up my app "manually".
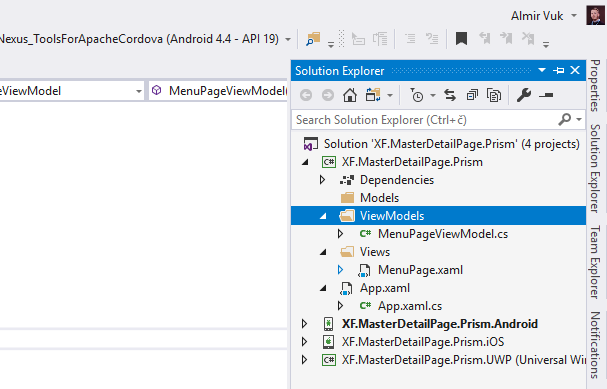
Before we install nuget packages create three folders in your code sharing project, three folders:
- Models,
- Views
- ViewModels
Just to organize our code and files in nice way.
There are three packages that you need to install:
- Prism.Core
- Prism.Forms
- Prism.SOME_IOC_CONTRAINER.Forms
In my case for Ioc I will use Autofac.
Now Right click on solution and start with installing nuget packages.

Install all of the packages to all xamarin projects in your vs solution.
Next thing that we need to do is to change some lines of code in our App.xaml.cs and App.cs.
I will start with xaml part and include new xaml namespace (xmlns) called prism like this:
... and App.cs
As you can see we have two new methods, RegisterTypes, OnInitialized. I will talk more about them in another blog post. For now you need to know that we use RegisterTypes method for registering types for navigation or some other services that we use in our App.
Now I will create new MasteDetail Page inside our Views folder and it will be called MenuPage.
First thing we need to do is to connect our View with ViewModel, using Prism there is something called ViewModelLocator.AutowireViewModel which will take a care about connecting view and viewmodel, creating a viewmodel instance etc.
Note: if you are following naming convention you don't need to use it, and naming convention is something like this: OurPageA -> OurPageAViewModel.
So to use ViewModelLocator.AutowireViewModel we need to add xaml namespace like this:
Now when we have this page... based on convention which we want to follow our view model for this page will be "MenuPage + ViewModel".
Inside ViewModels folder I will create that class.
We will use this class later, for now we need to know that this will be our ViewModel.
Back to MenuPage XAML code:
Main idea behind this ("my") version of master-detail is to have ListView where I can add menu items dynamically so in order to achieve that I need one ListView to represent our menu items and ObservableCollection to hold the data for that ListView.
Now I will create ListView and other controls inside of our MasterDetail Page.
All of that will go to "Master" part of MasterDetailPage, so inside of the Master part we will define xaml elements/controls, to use this master to navigate to pages we need to wrap our elements with NavigationPage. Inside of Navigation page I will have one ContentPage which will hold my ListView.
This is my xaml code.
Some parts that I am not explained are ListView.Behaviours and EventToCommandBehavior we will talk about that later in this blog post.
As you can see we defined ItemSource in our ListView, that ItemSource will be bind to the collection in our ViewModel, also we have two very common controls Label and Image to represent text of menu item and icon.
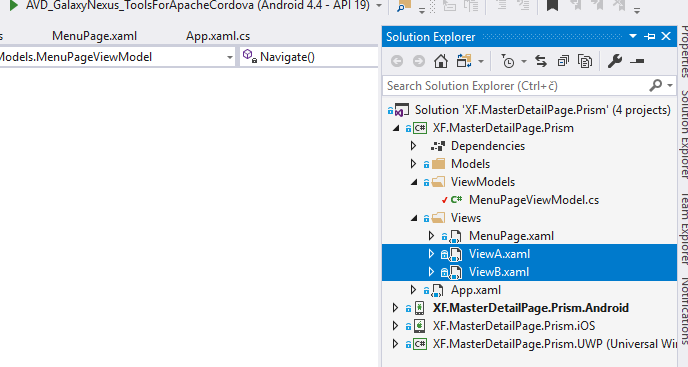
I will create two pages inside of Views folder, one page called ViewA and other called ViewB... I know I know you can clearly see that I am very creative 🤣.
Also I said (couple of times) that we will need some list or collection to hold menu items, but also we need to define which type that collection will be, so I will create new class inside of Models folder called MyMenuItem, and it looks like this:
Ok, now let's go to our view model, and see what should we need to add to it.
This is how our viewmodel should look like:
... I will explain code parts, properties and method that we use in it in following text, first we will go from our constructor which have one parameter of type INavigationService.
INavigationService is the interface that we get from Prism library, and it provides us very nice way of handling navigation in our app, and Navigation service from Prism library is one of my favourite features and just using it for navigation is pretty good reason vs "standard one" from Xamarin.Forms.
Next thing is BindableBase class which we are inheriting from, it is very nice implementation of base viewmodel class and it has some helpful methods that we can use, my favourite one is SetProperty it is used to check if a property already matches a desired value. Sets the property and notifies listeners only when necessary.
Next property is this private one of type INavigationService, which will hold reference to the navigation service which is passed via constructor of this viewmodel, and we will use it to handle navigation from our master-detail menu page.
The "main" property of this viewmodel is our ObservableCollection of type MyMenuItem, why am I using ObservableCollection, answer is very simple, because it is already implementing INotifyCollectionChanged and my UI will be notified automatically when our collection is changed (pretty simple).
Constructor is a nice place for us to initialize our collection and add some items to it, items that we will add will be our menu items in master-detail page.
Note: I am using some icons for my menu items, you can generate yours in whatever way you like, I am using AssetsStudio to get them.
Another interesting property is this of type DelegateCommand which is another great type/class from Prism library. It will be helpful for us because we will use it to bind our Event from XAML to it. In this tutorial I am not using the full power of it, maybe in some other blog posts I will but for now using DelegateCommand like this is enough for me.
In constructor you can see that we are creating new instance of DelegateCommand and as parameter we are passing our private "Navigate" method, which will be triggered every time we tap/click on some of the menu items from our ListView.
How are we accomplishing this, answer is simple by using ListView.Behaviours and EventToCommandBehavior by Prism, you can see that binding code in my previous xaml snippets.
Note: There is also way to pass some value from xaml to our command of DelegateCommand, that would be helpful to us to pass what menu item is clicked but...
I prefer to use SelectedItem property in ListView and bind to some property in view model, in this our case I am binding SelectedItem property to property called SelectedMenuItem and it is of type MyMenuItem. Maybe you are understanding the "flow" that I want to accomplish and that is, users clicks on some menu item in ListView, SelectedItem property of our view-model is updated and at the same time we have some method which will be called when that occur.
So we have, navigation service, collection of menu items, info about selected item and method which will be called, now we need to handle our navigation. You know that our MyMenuItem class has one property of type string called PageName, this property will be used to know to which page we will navigate. Every page we want to use in our navigation and we want to navigate to it must be registered in App.cs class inside of RegisterTypes method.
Now you can easily conclude that our next step is to register all pages that we want to use. In our case they are pages: MenuPage, NavigationPage, ViewA and ViewB... Registering the pages is very important thing unless you want to get exception (and nobody wants to get exception 🤣 )
Way of registering is very simple, we have IContainerRegistry which is some kind of apstraction above Ioc contrainer that you want to use with Prism, on that object we can call several methods, in this case the most interesting for us is method called RegisterForNavigation, passing the type to it we are officially registering that page and it can be used for navigation in our App.
Our App.cs now looks like this:
When we launch our app we need to define which first page will be that we want to navigate to it, in this case in OnInitialized method I am Navigating to our MasterDetail Page and than to ViewA, you can see that I am using NavigationPage in the middle of this "URL" and this NavigationPage is that one from our MasteDetail Page.
Note: Navigation in Prism is all based on this url format where we can define to which pages we want to go, and it can be something like this: ViewA/ViewB/ViewC/ViewD
Also we can pass parameters to it and so on... I am definetlly planning to make more blog posts about Prism in the future where I will cover navigation even more, for now this is what is important to us.
Back to our ViewModel and method Navigate, I already mentioned that this method will be called when we click/tap on menu item in our ListView, so we need to open that page, code inside of Navigate method will do exactly that.
As you can see we are using that navigationService reference and calling NavigateAsync method, and passing the string in following format nameof(NavigationPage) which is "NavigationPage" + "/" and after that we are accessing the PageName property of our SelectedItem
For example if users click on first menu item in our case that will navigate to ViewA and NavigateAsync method will get following value of string: "NavigationPage/ViewA" and if you remember we are inside of MasterDetail page so navigating from MasterDetail will get result that those pages will go to Detail part of it... and that is great for us, we have menu in side of master page and choosing menu items will open pages as Detail pages.
In other words clicking on menu items in master page we will open that page as detail page in our MasterDetail menu page.
I know that this is very simple but I also believe that this is very handy solution for master-detail navigation in Xamarin.Forms using Prism as a framework.
Here you can see the final result of our code:

I hope that this blog post was helpful to you, if it is share it and spread the words of wisdom 🤣, Ok Ok I am just kidding, but howevery you can share it, maybe it can be helpful for others too...
As always code sample repository, you can find on my GitHub page with this url here.
Also there is very good Prism documentation that you can take a look at here.
Best regards! Almir Vuk


9 comments
FYI you do not ever need to set the ViewModelLocator on any page handled by the Navigation Service, unless you wish to disable it, as the Navigation Service will set the property to true for you.
ReplyDeleteHi Dan! Thank you for the comment!
DeleteThere is a note in the blog post I don't know if you see it:
"Note: if you are following naming convention you don't need to use it, and naming convention is something like this: OurPageA -> OurPageAViewModel."
Or there is something else that I am not aware of it? :)
Hi Almir. Just wanted to say thanks. Was struggling to do the same with FreshMvvM and you got me on track to do it with Prism in a couple of hours.
ReplyDeleteAs a side note, in the xaml binding SelectedMenuItem is incorrectly called selectedPage?
Glad to hear that! Yes you are right that was a typo, when I am writing longer blog posts like this first I intend to make a working demo and than make a gists for blog post so maybe in that process I made some refactoring on source code, github repo is ok. But I corrected it here too, thanks again!
DeleteI am new to Xamarin. I was expecting the master page to able to contain a benner with a company logo, the name of the app and a welcome message to the user. But that does not apply here and does not appear to be the case anyway. Surely it must be possible without having to repeat the same code on each page?
ReplyDeleteHmm... but there is ListView there with items, that part can be customized and you can put there whatever you want? What do you think about that?
DeleteHello, nice work. However what would you do to cover complex scenario ? (Actualy, it's quite easy to navigate from ViewA to ViewB from the menu/master)
ReplyDeleteDid you manage to achieve more complex scenarios ?
The kind of real world scenario would be this :
Scenario A :
LoginPage -> MasterDetailPage -> MasterDetailPage.ViewA -> MasterDetailPage.ViewB -> ViewC (full screen without MasterDetailPage) -> MasterDetailPage.ViewD
Scenario B
MasterDetailPage -> MasterDetailPage.ViewA -> MasterDetailPage.ViewA.SubView1 -> MasterDetailPage.ViewA.SubView2
And if you want some challenge, handle the navigation from any view model without having it tightly coupled to the menu/master VM/P.
Anyway, you did a great post, I enjoyed a lot reading it even thought I did not learn a lot :)
Hello,
ReplyDeleteMany thanks for you work! I have one question...
When you navigate to a page since listview, the content page the refresh include the navigationpage,
Should not I just refresh the content, without the navigation bar? It makes an ugly effect.
Sorry for my english!
Thanks for sharing great post
ReplyDelete