
Xamarin.Forms and Realm: CRUD Example
Monday, August 07, 2017
For all of you who are not familiar with Realm here is a few sentences about it from their web site. Note: I will make another blog post about pros and cons, in the next blog posts.
"The Realm Mobile Database is built from the ground up to run on mobile devices. Unlike a traditional database, objects in a Realm are native objects. You don’t have to copy objects out of the database, modify them, and save them back—you’re always working with the “live,” real object. If one thread or process modifies an object, other threads and processes can be immediately notified. Objects always stay in sync.
The Realm Mobile Database is open source (using the Apache license) and cross-platform, with libraries available for Android, iOS, Xamarin (.NET), and React Native. Realms are fully interchangeable between platforms.
You can use the Realm Mobile Database all on its own." - From https://realm.io/docs/get-started/overview/
I was searching for some SQLite alternatives and when I first saw Realm I was:

It is very easy to begin with it, couple of nuget packages and you are ready to code a model and data access layer for your mobile app.
This tutorial will show you how to achieve CRUD in your app using Realm as mobile database.
So let's begin.
SETUP:
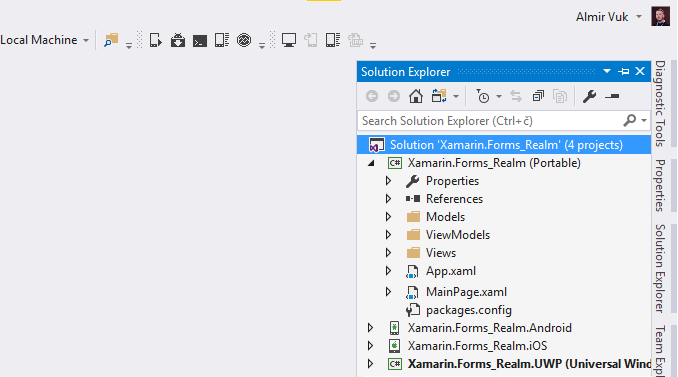
Create new Xamarin.Forms app, in my example I will be using PCL for "shared" code project.As always add three standard folders: Models, Views and ViewModels, we will use MVVM for our project as architectural pattern.
In order to use Realm database we need to add nuget package for our projects, so go to the Manage Nuget Packages for solution, and find Realm nuget like this:

Make sure that you install it on all projects: PCL and others (Android, UWP, iOS), wait couple of second and it will install some other nugets that are depending on this main nuget.
... and you are good to go.
This app will be about teams and players, so in the Models folder we will create two classes which will represent the Team and Player.
We have one-to-many relationship between team and player, so inside of Player as "foreign" property we will have property of type Team, on the other side at Team class we will have one List of type Player. Using setup like this we have our one-to-many relationship between these two classes.
To start using Realm as mobile database, we need to "create tables" in database, in order to do that classes which will be tables need to inherent from RealmObject.
Our two classes looks like this:
Team.cs:
... and Player.cs:
As you can see to declare primary key I am using data annotation [PrimaryKey] for property of the type string and it is autogenerated Guid, it is important to note that auto increment primary key is not supported yet in Realm.
Now we are ready we have our models with relationships, we need to start querying the data.
READ:
Now create one View/Page in our Views folder callled TeamsListPage.xaml and it looks like this:Few words about this xaml page from the top to bottom:
At the top we have one toolbar item for action of opening new page and adding new teams in the database.
Main part of our view is a ListView control, item source of this ListView is binding to the List in our view-model that we will create after this step.
In side of ItemTemplate we are making the structure of ListView items (how will ListView item will look like), and Labels inside of grid are binding to the properties of list items of type Team, because this ListView will be for listing the Teams in our database.
Before creating a view-models I will add one BaseViewModel class in folder ViewModels, basically this class will hold the OnPropertyChanged method, and every view-model will inherit from it and we will be able to call OnPropertyChanged method for our properties.
BaseViewModel looks like this:
Now when we have our view, we can create our view model, in folder ViewModels add new class called TeamListViewModel.cs:
At line 28: We are creating new object of type Realm and that object is basically representing our mobile database.
Using it we can do CRUD operations with it.
A line 30: I am initializing our ObservableCollection called AllTeams with result from context.All
... and it will return IQueryable so you can use LINQ with it.
As you can see querying the data is very similar, not same but similar to EF style, later in this course we will do "Where" and other condition on lists.
And at the end of the constructor we are initializing the AddTeamCommand and when users click on our toolbar item we will navigate to AddTeamPage which we will create in next steps.
Also do not forget to set binding context to the ViewModel from your view code-behind.
We will not run our app for now because we will get empty listview and that is not something useful 😆... but you can rebuild and run in just in case to be sure that Realm part is not throwing any exceptions, and also I am sure that my code works 😎
Now when we have our page for listing the teams, we need to make a view for adding (Creating) new teams.
CREATE:
In the Views folder create new page called AddTeamPage.xaml, and it should look like this:
As you can see it is very simple "input form" page with couple of Entry controls for entering data for Team properties, and one toolbar item which handle the save/create operation on the database.
Next step as always is to add view-model and following our convention it will be AddTeamViewModel.cs:
Our view-model is very simple we have couple of properties, inside of the setter you can see OnPropertyChanged method, standard MVVM approach, when property is changed controls from XAML which are binding to it will have updated value.
On my blog I have couple of MVVM blog posts so you can check it if this is new to you.
Also we have one Command which will invoke method SaveTeam() where is located the main part of our view-model.
Inside of SaveTeam we have again Realm object named context. Below it there is a two ways of making insert in the the db.
You can use context.Write() and inside of the new delegate there is a main part of inserting like this:
and also there is a approach with using, where you need to make new transaction which you will get from BeginWrite method. It is important to commit your transaction to apply changes.
... and after adding new entry to database close this page.
Do not forget to add binding context to code behind of our view.
Now we can run our app and test it.
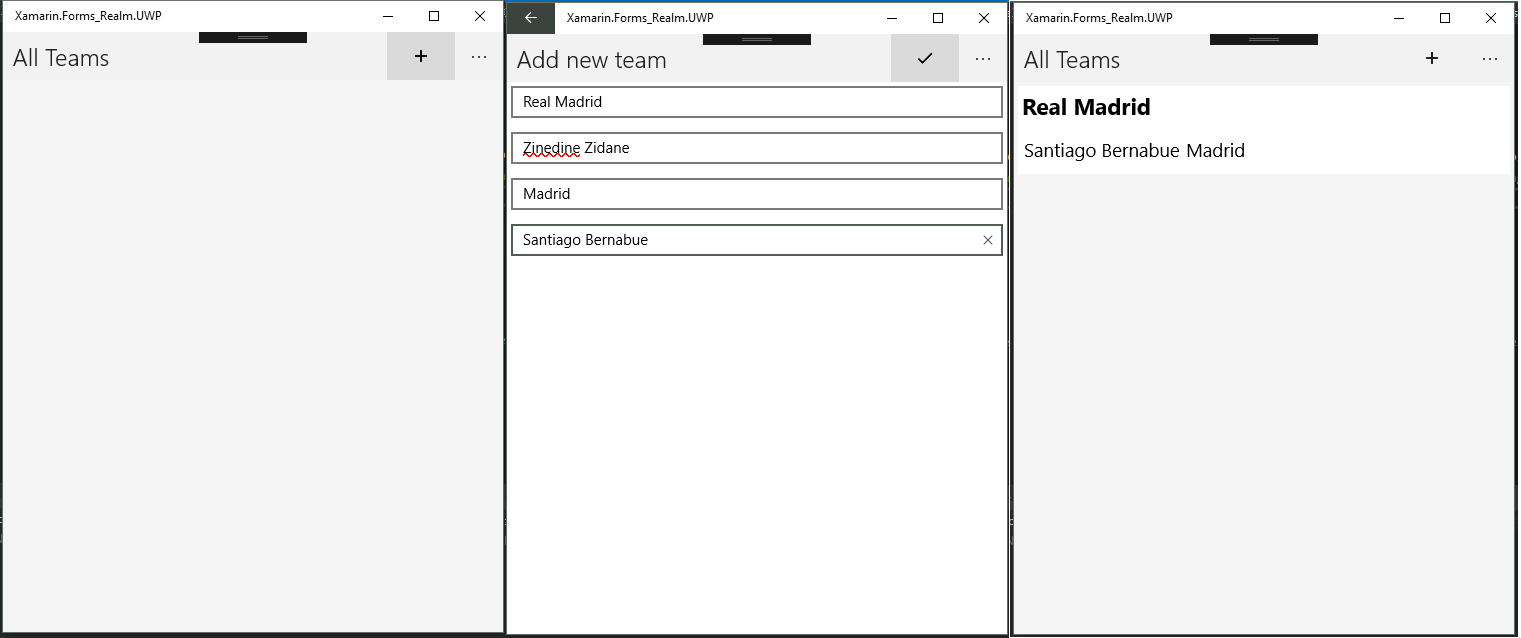
It works! 😀
So we can continue with tutorial.
DELETE:
Next step is to show details about team and add players to it, and also delete the team if we want.First step is to create TeamDetailsPage.xaml in our views folder.
Like this:
At the top we have couple of toolbar icon for actions that we will implement in the next steps.
After that we have couple of labels which will hold the data for the Team, and below them there is a simple ListView for the players of that team.
Actions are: add new player, edit this team and delete it.
For now let's start with view-model for this details view:
As you can see very simple view-model couple of properties for team details, one ObservableCollection for team players and couple of commands.
First thing that this view-model does in the constructor we are passing the teamId which is passed from TeamsListPage.xaml.cs from event called TeamTapped so take a look at that implementation.
This is a common way to get value from tapped item in ListView and we are navigating to the TeamDetailsPage and passing the teamId value to it.
TeamDetailsPage.xaml.cs looks like this:
Also here we are implemented OnPlayerTapped event where we are opening the EditPlayerPage will we will cover in next steps, for now let't go back to our TeamDetailsViewModel.
After ObservableCollection there is a couple of command for toolbar items.
In the constructor using teamId we are setting it to the private field _teamId to use it outside of constructor.
Now again we are creating Realm object from GetInstance method.
and new object called team will be created from database, we are fetch it using generic method called Find with this syntax:
... after we get that team we can set the properties of view-model.
We are initializing observable collection from database, and we are using ".All" method, ".All" method is returning the type IQueryable so we can use LINQ without any problems, here you can see that I use Where condition to get only those players which are playing for that team.
First time I was writing this, I was trying to set condition like this: .Where(p => p.Team.TeamId == _teamId)
but as you can see from my comments "Querying by nested RealmObjects attributes is not currently supported".
Bellow you can see couple of command initialization, last one for deleting object is one that I want to cover in this part of tutorial.
Again we create Realm context instance, find this team using Find method via teamId.
You need to open Write method and inside of it with very simple Remove method we can delete our object from database.
Remove method is accepting RealmObject as parameter and that is it our team will be deleted in this case.
You can test this part if you want (of course you want).
Next step is to see how to Edit/Update objects in Realm.
UPDATE:
Nothing new 😃
Now create new EditTeamViewModel, and put this code inside of it:
And let's talk about it... through the constructor we will get teamId, after that standard way of getting data from database by Id and setting the properties of the view-model and initializing the command for saving/updating the team data.. nothing special here.
But in the other hand SaveTeam method is very interesting. SaveTeam method will be called when user click on the "Save" toolbar item.
In the SaveTeam we are getting the object by Id... and interesting part is to open that Write method and inside of the delegate we are setting the new values of that team object. If you try to set it outside of the Write method and delegate inside of it you will get the exception: Attempting to modify object outside of a write transaction.
So it is very important to keep in mind that all update operations you need to do inside of Write.
When we are done with setting new values, all we need to do is to commit that changes, in Realm you can update the object in database using Add method, but as second parameter "update" which is of the type bool, it is self explanatory what to do here, so just set it to true and your object will be updated.
Let's test this 😊
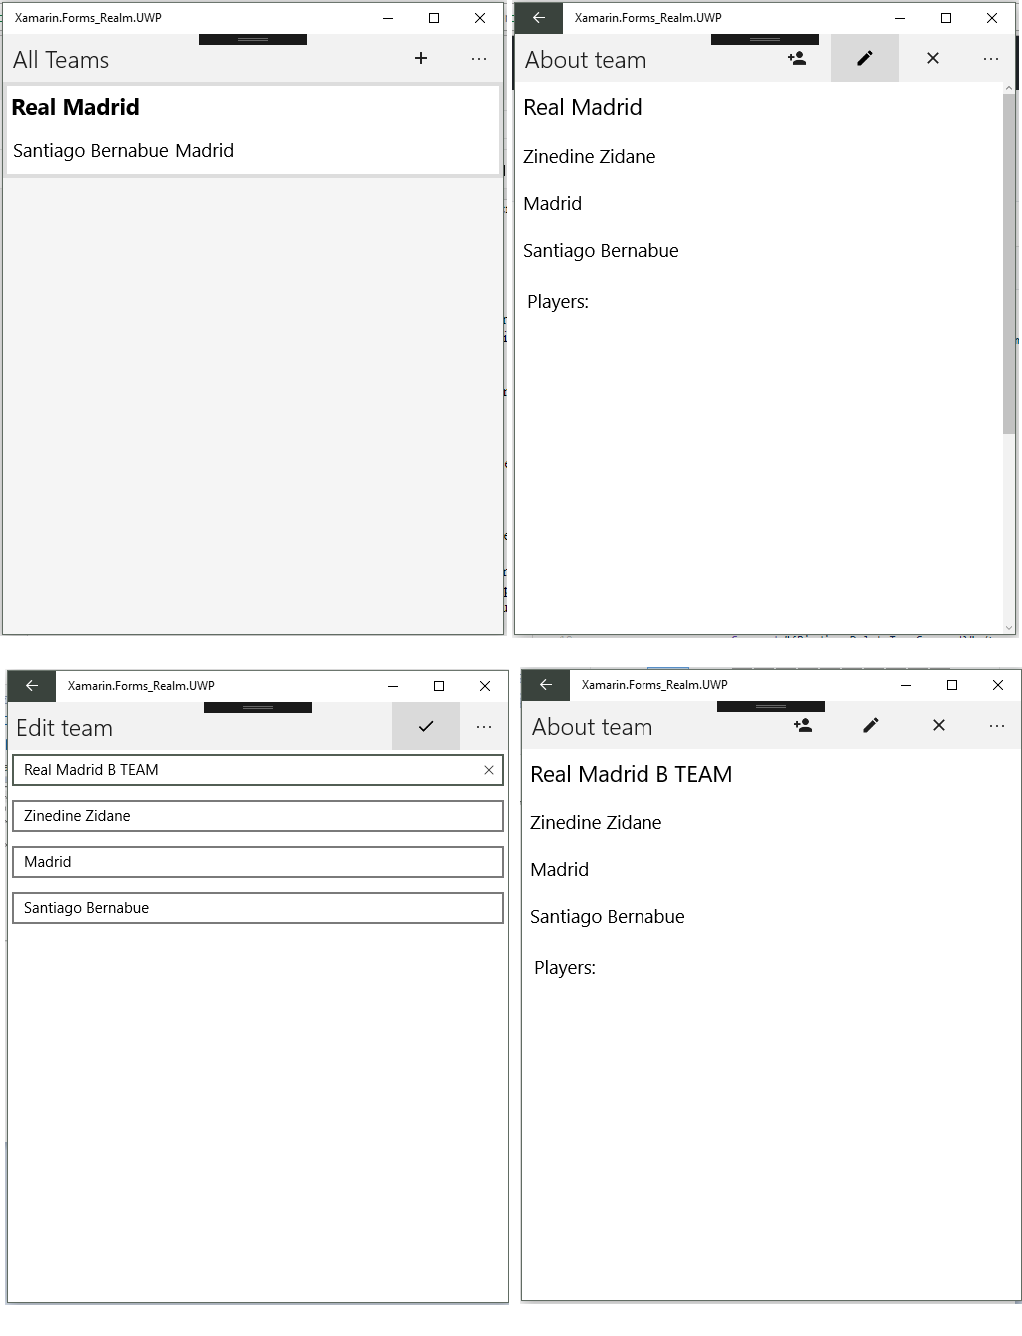
Looks good to me.
With this example we have our CRUD with Realm mobile database completed for Team class/table.
In the next steps I will cover how to add new and update existing one player with foreign object to the Team, remember our one to many relationship for these two classes. You can try this by yourself, following this tutorial you have all knowledge to do that.
Add new player to the team:
Inside of the team details page we have one toolbar item for adding new players, so open your TeamDetailsViewModel and set command to open AddPlayerPage and pass teamId to id, in my gists above I have already done that.If you are not, create new AddPlayerPage and XAML part should looks like this:
code behind for this XAML page looks like this:
As you can see from TeamDetailsPage we are passing the teamId value to the AddPlayerPage and when we are setting the BindingContext we are passing the teamId to the AddPlayerViewModel:
Now let's see what we are doing in this view-model, we have couple of properties to bind to them. Also there is one Command for saving action.
In the constructor we are creating real object called context in the standard way that we learned from past steps in this tutorial.
The main part is in SavePlayer method.
First step is to fetch team by id, for that team we will add new player. As you know SaveMethod is called when toolbar item is clicked.
At the line 71 we are calling the write method and with delegate in it we are adding new player and for foreign property Team we are setting the team that we have from earlier steps.
Now run the app and test it:
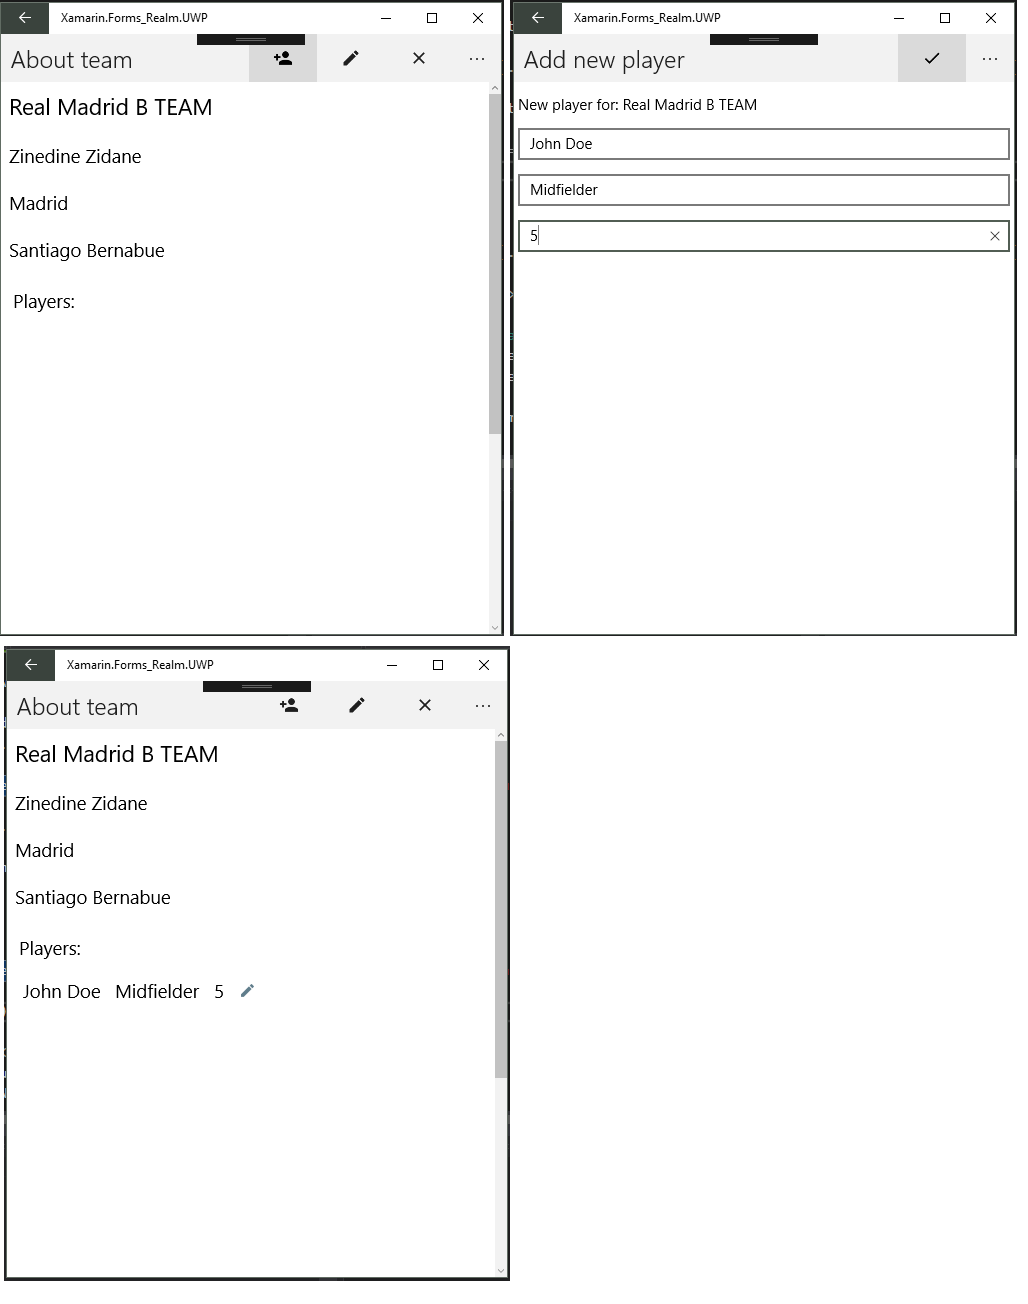
It works!
One last thing is to do update/edit page for Player.
As you can see in our TeamDetaisl.xaml.cs we have one event called OnPlayerTapped where we are opening the EditPlayerPage and we are passing the playerId to it.
EditPlayerPage is very similar to the Add page and it looks like this:
Code behind is like this:
... and our view-model is here:
I think that this code is very clear, there is nothing new that is not covered in this blog post. Code for this example is available on the my GitHub page at this url: https://github.com/almirvuk/Xamarin.Forms_Realm_Example
I hope this tutorial was helpful for you. My goal with this tutorial was to show CRUD examples using this great Realm mobile database. I am sure that I will use it in the future. If anything was blurry you can write me in the comment section down bellow. If this was helpful you can also write it, and share it with your friends.
Best regards! Almir Vuk


8 comments
Hi Almir,
ReplyDeleteFirst thanks for sharing that concise tutorial. How about Offl i ne Sync capability ? Are the objects persisted when the apo is closed and restarted? Could you provide some sample to use a REST API (classic Web Api Controller or Azure Mobile Apps Custom controller)?
Best
Eric
Hi Erich,
DeleteThank you for the comment. I am glad that tutorial was helpful.
If we are talking about built in sync there is something called "Realm mobile platform" you can see here more about it: https://realm.io/products/realm-mobile-platform/
In this tutorial I am covering only the database part, as replacement for the SQLite... I am not sure what you mean by this "Are the objects persisted when the apo is closed and restarted?" if you can explain it in the another comment, yes data is in your app on device, after closing and opening again just like normal database (if you are asking that).
And about more tutorials, yes I will make some of them in the future, right now I am working on my final school project and I'm less active on blog, but I promise more tutorials with realm.
Best regards!
Thank you for your great work!
ReplyDeleteCan I translate this article into Japanese and post it on Qiita(service that shares programming knowledge with programmers)? Of course I will specify the source(the title of this article and the url).
A lot of engineers of the JXUG(Japan Xamarin User Group) are interested in this technology and your article, but there is little information written in Japanese on Xamarin with Realm.
So please let me introduce to your wonderful tutorial to Japanese!
Yes you can, but under one condition and that is to sign me as an author of the blog post and put original (this) blog post URL.
DeleteBest regards!
Excellent tutorial thanks for your apotes to knowledge, in the next few days I will give a conference on local data in xamarin.forms and I will reorganize the conference to talk about this topic and make an alucion to your blog with this link, Thank you very much for Your contribution, after the conference, I'll tell you how I was, cordially @ josetobenito
ReplyDeleteHi Jose,
DeleteI am very glad that my tutorial was helpful for you, good luck at conference!
Best regards!
Toolbar items not displaying.
ReplyDeleteHi,
DeleteHave you added the icons to your platform specific projects?