
How to make Master-Detail Page Navigation menu in Xamarin.Forms
Thursday, December 01, 2016

I am playing with Xamarin.Forms for a little while (more precisely maybe about half year) and now I want to make some more serious project for one of my clients.
Main logic of app was done and I wanted to make some cool navigation for app something like Navigation Drawer on Android. So I started to look up for the way to do that on Xamarin.Forms platform but the most of tutorials out there are not enough for me. Look of UI of those navigation drawers or master-detail page are not acceptable for me. So I decided to make some cool look for it and I hope that you will be satisfied with it.
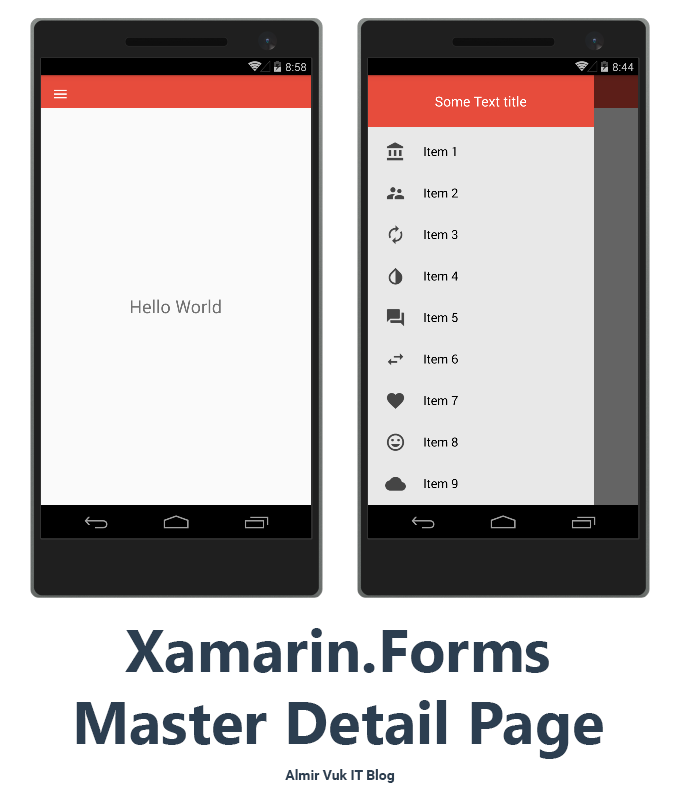
This is a final look at our app, this is how our navigation drawer (master-detail page menu) will look like on Android. Follow tutorial to get this kind of result:
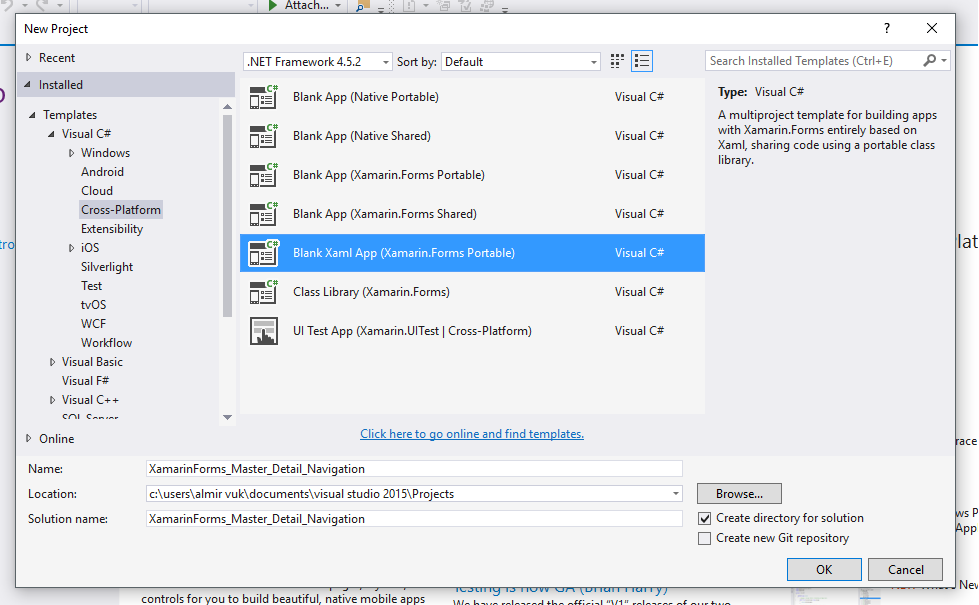
First of all we need to create new project, for this tutorial I will make new Xamarin.Forms app like this:
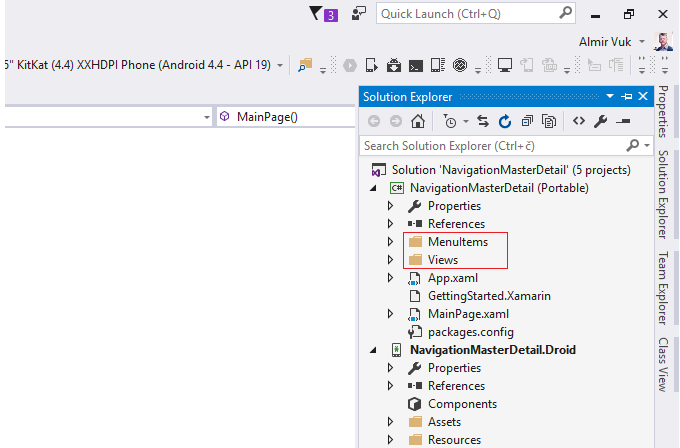
After couple of second when our solution is ready we will go to the Portable project which holds and share main code for our Apps.
I love to do project code separation with folders, so I will make two folders one called Views for our Pages and one called MenuItems for our classes which relate to our menu navigation. For now we will have just one class but in the future if we want to upgrade this solution we can store our classes in that folder and anyway project it looks nicer with folders. Like this:
And inside of some basic three pages with Label just to show that that page is open, xaml of page is this code:
In side of folder called MenuItem I have one class: MasterPageItem.cs, and it looks like this:
Class MasterPageItem will be useful to hold data and info about our menu items, as you can see we have three properties for title, icon (path) and type property to hold info about page that we want to open, this is very important class for next steps in navigation menu implementation.
After we have those classes we can go to the main part in our MainPage.xaml and MainPage.xaml.cs.
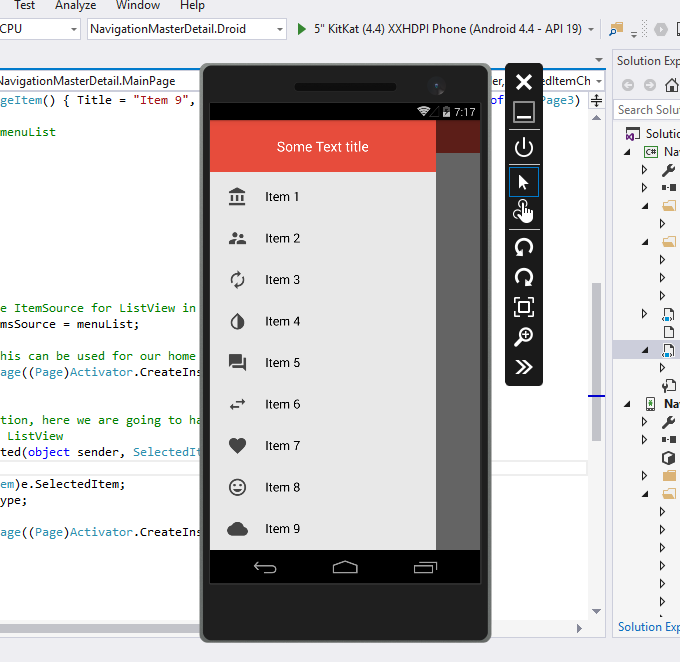
Main reason why I had go to tweak this and make my own design of navigation drawer (menu) is to look modern and clean with nice symmetry of elements in menu items. So to get final result from image that you could see at beginning of blog post you need to have MainPage.xaml and ListView setup like this:
The parent element is of course MasterDetailPage and inside of it we can two child elements MasterDetailPage.Master and MasterDetailPage.Detail if you are not sure what for what is master and for what is detail part you will get it in the next steps.
As you can see inside of MasterDetailPage.Master we have ContentPage with one main StackLayout as a parent for two more StackLayouts. First one is for some info at the menu which will be presented above ListView menu. In this part you can put all kind of elements which you need to have such as like profile image for user, email or any other info, for my example I have only one Label just to show some data.
At second StackLayout our main part is located, we have ListView of menu items to show inside of navigation drawer (menu). There is a ListView with some properties which you can tweak if you want to get better or some other style, this is best for me so I included it in this tutorial. Inside of ListView we have ListView.ItemTemplate and DataTemplate for standard binding, and main design for menu items is in the StackLayout where I have Image and Label elements with those properties and sizes in order to make nice design.
Background of ListView and this Master part is some kind of gray with this hex code: #e8e8e8
And the color of menu items is: #4c4c4c.
Now when we have this XAML part done we need to insert some data in ListView of menu items. Logic and code for that we will have in code-behind file called MainPage.xaml.cs and it looks like this:
Now I need to put those objects inside of menuList and the main step is to set ItemsSource of our ListView in XAML to be our List of MenuPageItem called menuList.
When you will be exploring demo code on GitHub you will see that I have some of comments that are explaining what code do.
At the end of constructor we are defining what first page will be "loaded" into the Detail property which represents the Detail side of screen, while Master is for menu or other navigation items.
If we run our app we will get this result:
If you were reading code from code-behind file you seen the event which is triggered when user select one of the list items. You just for some explanation I will paste that event code here:
And we need to specify this event at ListView in XAML:
I hope that you like this kind of style of navigation drawer (master-detail page) in your Xamarin.Forms App. Menu items looks like modern design app style and you have top area for your other informations about user or app. I tried to simplify this tutorial more as I could so I think that this tutorial can follow all kind of developers beginner or advanced ones. If you want to improve this code you can do pull request on GitHub or you can customize and use it how you want.
Source code is available on GitHub.
Hope this tutorial was helpful for you and that this will be nice part of your new App.
Best regards! Almir Vuk


67 comments
Almir, I've been a developer for mainframe and pc operating systems for many years. I am new to the development of Android apps. Very humbling paradigm but very interesting. Thanks for this tutorial relative to Master-Detail Page Navigation. It was well done and very beneficial to my learning curve. Kudos to you sir and thanks!
ReplyDeletehow can navigate to menupage(side) when i am in another menu page master details in xamarin forms?
ReplyDeletehelp me
Thanks&Regards
Can you explain your question more. Best regards!
DeleteHi. Thank You so much ...was looking for a proper sample like this one. thanks again
ReplyDeleteThank you for the "tutorial". I've got the project working and starting to figure somethings out about the files etc.
ReplyDeleteHow can you define the colors of the Top bar, and active menu screen? I have made the background for the "Some text title" menu grey with a hex code defined in the xaml page. How can I change the red top bar and orange active menu?
Hi,
DeleteThank you for the comment I am glad that this was helpful for you,
Have you tried with "BarBackgroundColor" in XAML for the page you want to edit. And for menu item color have you tried with styles in Android for default values, or you can try to implement some custom actions when user tap on the menu item to set background of stacklayout or something like that.
Best regards!
Hello Almvir,
DeleteI haven't tried the BarBackgroundColor, I think I have misread the search results and tried this in the master page! I will try to figure that out then.
So the red bar and orange selected menu is the default color then? I was trying to find these colors declared somewhere in alle the pages but I was thinking of that all wrong then.
Thank you for your reply and pushing me a little in the right direction once again!
Nice to hear that, best regards!
DeleteIn Android, you can change those color in style.xml. I couldn't find any solution for changing those color in XAML for cross platform though.
DeleteFor BarBackground, that is your PrimaryColor. So, you can change it by replace this hex into your desired color
<style>
...
<item name="colorPrimary">#2196F3</item>
...
</style>
For the selected item itself you also can change it by adding this value into your style.xml.
<style>
<item name="android:colorPressedHighlight">@color/ListViewSelected</item>
<item name="android:colorLongPressedHighlight">@color/ListViewHighlighted</item>
<item name="android:colorFocusedHighlight">@color/ListViewSelected</item>
<item name="android:colorActivatedHighlight">@color/ListViewSelected</item>
<item name="android:activatedBackgroundIndicator">@color/ListViewSelected</item>
</style>
<color name="ListViewSelected">#96BCE3</color>
<color name="ListViewHighlighted">#E39696</color>
Thank you for providing us a help with colors. :D
DeleteGood job ! But u don't have this result on iOS and Android Android know. On iOs the menu is good but the hamburger menu is remplace by the title "Menu" and i don't have color on the first page
ReplyDeleteHelp me please
Thank you !
Thank you for the comment, can you upload a screenshot for result on iOS?
ReplyDeleteBest regards!
Hello can you help me I want to realize a master detail page but with the menu hanburger has right
ReplyDeleteHi Jacques, thank you for your comment. I don't think that this is possible right now... If you find solution anywhere else please comment it here also :D
DeleteThank you! This help me!
ReplyDeleteI am glad to hear that!
DeleteThank you so much for this easy explanation.
ReplyDeleteit very use full
Thanks ALMIR VUK.
ReplyDeleteIts works like charm. Thank you so much for your clear clarification on single line of code.
Appreciated one! Thanks again.
Hi ALMIR,
ReplyDeleteIt works like charm :) I am struggling with with Hamburger menu button.I wanna change button for Android and IOS, but it is taking bydefault from somewhere.I also tried adding icon property for Masterdetail page and Its master page but didn't work.Also this default icon looks quite large in IOS specially.Can you please help me ho i can replace hamburger button with new new one.
Thank you for the comment at this time I think that changing the hamburger icon is impossible from my expirinece. Best regards! But there is a good thread on Xamarin forum about this topic so you can check it out there: https://forums.xamarin.com/discussion/69113/how-can-i-change-the-hamburger-icon-for-another-one-in-xamarin-forms-for-android
ReplyDeleteDefault Hamburger button is looking fine in Android.But it is too large in IOS platform.I dont know from where it is taking this default one and how it is setting its size. Stukked at this point :(
DeleteTank you sir, im a cordova developer, learning/migrating to xamarin and this helped me a lot understanding xamarin.
ReplyDeleteGlad to hear that... keep on learning Xamarin is a great technology!
DeleteHi! Thank's for your help! But I would like make on the listview a Item for Logout it's possible make this by mail for check my code?
ReplyDeleteThank's
Hi,
DeleteJust add item as any other... and when user click on it you can go to another page where you will cover "logout" methods and other stuff... after that just clean the navigation stack and go back to your login or default page.
Hope that this short answer is helpful for you,
Best regards!
This is my code to logout:
Deleteasync void logout_Clicked(object sender, System.EventArgs e)
{
List liste = await App.Database.GetUtilisateurs();
foreach (var item in liste)
{
await App.Database.DeleteUtilisateurAsync(item);
}
App.Current.MainPage = new RIYRPage();
}
It's right?
var Logout = new MasterPageItem() { Title = "Déconnexion", Icon = "itemLogout.png" TargetType = logout_Clicked; };
Thank you and sorry for the comment on your blog
There is no need to say "sorry" I am glad that my blog post is helpful for you... as I can see your code is reseting your database when user clicks on logout... I think that this is OK and after logout you are returning user to the first page. As I can see this is OK.
DeleteBest regards!
Ahah ok :)
DeleteThis ligne is false: var Logout = new MasterPageItem() { Title = "Déconnexion", Icon = "itemLogout.png" TargetType = logout_Clicked; };
Erreur: Cannot convert method group 'logout_Clicked' to non-delegate type 'Type'. Did you entend to invoke the method?
How to correct this error?
Thank you!
Maybe you can have another blog from this content and make them MVVM like it's using INotifyPropertyChanged and the MVVM pattern itself. :) Anyway, this is nice content :) Keep it up!
ReplyDeleteThank you! Yes! That is a plan for future blog posts, these days I have some projects, after that that blog post is primary task! Best regards!
DeleteHi Almir, Thank you so much for your post.I want to add submenu items when clicking on menu items like https://i.stack.imgur.com/35gZz.png Any help for this? Thank you.
ReplyDeleteHi Raj,
ReplyDeleteI am glad that blog post is helpful for you... I am sorry right now I don't have an idea how to implement something like this.
Best regards!
Very helpful! Thank you! :)
ReplyDeletei am trying to add listview in stacklayout control but the page occupies from top of the screen but i want it inside my content page.
ReplyDeleteplease help
Can you post some code on gist or something.. I will be glad to help you!
DeleteFirst, thank you for this nice tutorial. I tried this out but i did not became the same result look. The padding in the Menu ist not the same, it starts allways from top of the Display, i tried to use Padding="0,20,0,0" but it does not look like yours. I tried this on Andorid. What can i do?
ReplyDeleteYou can see the Code and Screenshots here on my OneDrive:
https://1drv.ms/f/s!AkNT1uV29I5igUT107TBpiUhJk8f
I am glad that this was helpful for you!
DeleteI seen your code and your mistake is in Label you are not setting it to be in the center, you need your label to be like this:
Your label properties:
Text="Some Text title"
FontSize="20"
VerticalOptions="CenterAndExpand"
TextColor="White"
HorizontalOptions="Center"
Best regards!
Any way to move the menu button to the right?
ReplyDeleteAny XAML rule that you can apply to the some view you can use it for the Data template items inside of ListView.
DeleteBest regards!
I tried adding a HorizontalAlignment tag to the MasterDetailPage element but it didn't work.
Deleteis that incorrect?
What menu button you want to move, hamburger icon? I as know that is not possible right now with Xamarin.forms with some simple way.
DeletePlease write more info about it, I will be glad to help you!
Hi Almir,
ReplyDeleteI would like to know if you know how to make the same menu appear on iOS, I mean, put it on top of the content. That the animation is the same in iOS as in Android, because I could not find a solution to this.
Best regards!
Hi,
DeleteMaybe I am not the best person to ask about animations on Xamarin, so I am very sorry I do not have any experience with animations on Xamarin, especially with master detail page.
Maybe you can try to explore official docs: https://developer.xamarin.com/guides/xamarin-forms/user-interface/animation/simple/
Best regards!
Thank you very much and congratulations for the post. Well done.
ReplyDeleteThank you very much!
DeleteThank you for this detailed, easy to follow guide on how to create a hamburger menu. I just started learning xamarin forms, I would appreciate very much if you can provide additional guide or code to create horizontal lines to separate one group of menu items from another group.
ReplyDeleteThank you and regards,
Hi Francis,
DeleteThank you for the comment, I am very glad that this blog post was helpful for you.
I am planning to make another blog post about master-detail navigation page, so when I find some time I will make that one.
Best regards!
Hi Almir
ReplyDeleteIs there any way to reduce the width of master page to half of the screen?
Hi Abraham,
DeleteI think no. I did not have need for that in the past so I did not even tried.
Sorry,
Best regards!
Hi Almir
ReplyDeleteThanks for the great post! I want to add a login screen before I enter the menu. Can you give me some pointers on how to do this
Hi Lloyd,
DeleteSorry for late response I am having quite busy days :D
That should be very simple, just from App.xaml.cs navigate to your LoginPage and after successful login you can "reset" Navigation Stack and navigate to Menu page which is of type MasterDetail.
If you have any other, or some specific issues or questions feel free to ask them here.
Best regards!
Is their a Nuget package that I need to load to apply this MasterDetail solution?
ReplyDeleteThis is very simple implementation so I don't think there is no need to make nuget for this. But thanks for the question.
DeleteHi, it's there any way to maintain PushAsync navigation of the items of the menu (Detail pages) and show the hamburger icon in that pages?? I saw apps with that behavior and I would like to do it in my application too.
ReplyDeleteThank you
Hi Bruno,
DeleteNatively no... I did not have any need for that, but you can play with custom navigation bar and make buttons which will trigger the IsPresented property of MasterDetail Page. So it is possible in some way to accomplish that, but you also need to take care of back button and how are you planing to go back, on iOS there is no hardware back button.
If you have other question I am here to help.
Best regards!
I added a button named 'Image' on master page. Now i need to load all images from phone memory in grid format each row contains 4 images. Please help me.
ReplyDeleteHi Abraham,
DeleteThat is not related to this blog post. Sorry.
Best regards!
Thank you for your answer. I tested and I will stick with your approach. Keep up the very good work on your tutorials! They are helping me a lot at the final project of my degree.
ReplyDeleteNice to hear that!
DeleteThis comment has been removed by the author.
ReplyDeletehow can i change the color of selected list view items color
ReplyDeleteHi,
DeleteYou can take a look here for more info:
https://forums.xamarin.com/discussion/100694/how-to-change-the-listview-selected-item-background-color
hello
ReplyDeletei am looking for the solution as attached pic.
https://us.v-cdn.net/5019960/uploads/editor/4h/kpe734n4nnmb.jpg
is this navigation bar is possiable in master detail page.
your response is valuable for me.
Hi,
DeleteI would suggest you to take a look at this blog post: https://blog.xamarin.com/xamarin-forms-3-2-0-released-going-big-with-little-things/
Here you can see an example of title view which comes in XF on 3.2 version where you can basically put anything in the title navigation bar :D
Hope this was helpful for you!
As you said, we can see inside of MasterDetailPage.Master that we have ContentPage with one main StackLayout as a parent for two more StackLayouts. Please show another tutorial showing how to put element such as profile image and name of user in First StackLayout.
ReplyDeleteThank you!
ReplyDeleteHi ,
ReplyDeleteIs it possible to open side menu in every page